Showing posts with label card. Show all posts

Friday, September 26, 2014

Quick cards w/ Ange

 Quick cards are the way to go in my book. I want them to look like they took a lot of time, but be fairly simple. I think one of the best ways to do that is to use pp for your background. The problem with that is making sure the inside works to write a little note to the recipient. 


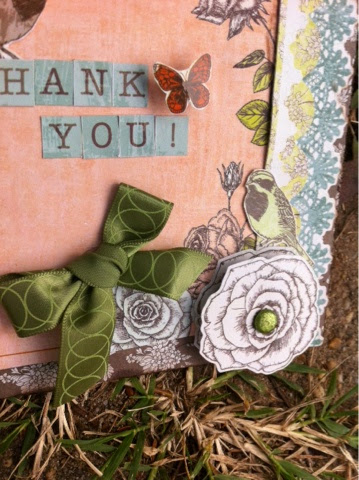
For this card I wanted to use the PL style notecard, from Telegraph Road by Kaisercraft, on the front and decided it would look great over the Memo paper, so I made that the background. 


Of course that makes for a really busy inside, but the cool part is that it looks like postcards. So I grabbed a couple mini postcards from the die-cut shapes pack, inked them and added them to the inside for writing on.


 For this one I used a plain white background but spruced it up with some mists and ink. Then layer your pattern paper with this cute journaling card and some flower die-cuts, add your sentiment and voila, 2 quick and easy cards!

You can find this beautiful line in the Speedy Scrappers store.
Don't forget to share with us on facebook!

:)Ange

Tuesday, September 23, 2014

You are a star!!! Card

Hi all, jen t here.  happy tuesday!!i am just over the moon excited to make another card for you! ;) For this card i used the kaisercraft blast off papers. I started with my favorite size card base 6 x 6 of the kaisecraft blast off star paper then I layered on strips of barcode style paper and zigzag border stickers from the hello sunshine collection and distressed some of the edges a bit. Then, I cut out the your a star square from the blastoff cut apart sheet and a star from another sheet to popdot it and layer. next. I cut out of another sheet of paper the cute lil alien and only half pop dotted him and placed him below the star to look like he was holding it up. lastly,  I used dimensional glue to accent the lil stars and the alien eyes. thanks for stopping by and happy creating!   jen t.


To check out more awesome goodies and inspiration "like " Speedy Scrappers at www.facebook.com/speedyscrappers and visit the website at www.speedyscrappers.com  or get your supplies in the Speedy Scrappers store.


Friday, August 29, 2014

Hello cards w/ Ange

What's up Friday?!
The last Friday of August, I don't believe it! It's also my baby boy's 5th birthday!! He is growing up way too fast.
I have a couple cards for you today using Telegraph Road from Kaisercraft. You can find it in the Speedy Scrappers store. One of them I did make into a birthday card for my mom, but they are both really general on the front, so you can do whatever you wish when you're ready to send them.

First up:


This is the one I turned into a birthday card. I started with a white cardstock base. Then I used the 4x6 pocket page card from Receive on the front and took one of the 3x4 ones from Parcel and cut out just the "Hello Sunshine" portion of it to add as a sentiment. I rounded a couple of the opposing corners before sliding it under the portion of the flowers that I fussy cut, so they would sit on top. Then finished up with some clear stickles. Inside I just added a Happy Birthday sentiment with a stamp and then wrote in it. 

Next up:


For this one I started with a white cardstock base then added Letter to it after punching the borders. I then used another 3x4 card from Receive to add over the top along with the Hello banner and a couple of Irocks from Imaginisce to glitz it up a bit. Add your sentiment inside and you're ready to mail!

  Have a scrappy weekend my friends!
Don't forget to share your creations on the facebook page!!
:)Ange

Tuesday, August 26, 2014

You and me card by jen t.

 
Hi all, happy tuesday!! I am sharing with you yet another 6x6 gate fold card and envelope i made using... kaisercrafts honey chai..( did you figure out by now that i love this collection) . To make this card i first started with a 6x 12 piece of the green wood grain paper and folded it on the 3 and 6 inch then folded inward toward the middle. I then cutout a journal card i liked for the top of the card but the saying wasn't what i needed it to say so i took a piece of the striped pp and but it over the words to  add my you and me stickers on top. I then adhered only the left half of the journal card to the flap and added a butterfly stickers folded added to the edge of each flap. Lastly i printed a poem , inked all edges if the card and matted it to the floral paper and added pearls to the flowers and butterflies to fancy it up a little bit more. Thanks for stopping by and happy creating! jen t.


To check out more awesome goodies and inspiration "like " Speedy Scrappers at www.facebook.com/speedyscrappers and visit the website at www.speedyscrappers.com  or get your supplies in the Speedy Scrappers store.


Friday, August 15, 2014

Two cards w/ Ange

Hello and Happy Friday!
This is our last weekend before school starts up. I can't believe that, technically, summer is a weekend away from being over. Crazy. Well, I plan to go party it up a bit at our local fair before my kids head back and we get into the regular grind.
Before I take off tho, I've got a couple cards for you:


I used Kaisercrafts Telegraph Road from Speedy Scrappers for both of these, they are 4.25x5.5. For this first one I inked the base with a bright pink, then used a loopy border/corner punch on a scrap of Letter pattern paper, layered a couple die-cuts, stickers and this easy sticker sentiment.


I wanted a different look for this one so I used weathered wood ink, it has a bit of a blue cast to it that I liked. Then I put the border sticker across the top, just trim it down to the size you need. After that I found a scrap of the pink Message paper and punched the corners. I didn't like it straight on the card, so I cut a piece of Memo to back it with and rounded the corners. Then I layered the stickers, die-cuts and sentiments but finished up with some bling across the top.

If you get some scrappy time this weekend, come show us what you're up to on the Speedy Scrappers facebook page.
Have a great weekend everyone!
:)Ange

Tuesday, August 12, 2014

You are no. 1!!! Using kaisercraft blast off collection by jen t.

Hi all, happy tuesday!!!  I am excited to share a fun card i made with ya today using the papers from the blast off kaisercraft and border stickers from the hello sunshine kaisercraft collection.  It is a 6 x6 card (my fav size) with a square window. I first cut out the word paper and used it as a base and then adhered the red star cutout on top.  I looked at it and didn't like it so i saw my alien cutout and thought it would look cute peeking out of the card. So, to make the square window i busted out my old school fiskars shape cutting board and picked a square closest to the size of my lil alien and held my breath as i cut thru the two layers of paper without a mistake and swoo! It did! :D i then put him from behind on to the inside of the card, added the sticker border strips to the top and added some punched out and pop-dotted shapes for dimension. Next i cutout the words you are and made it into a banner for the top left corner Then for a little sparkle i added layered white and green sequins for the aliens eyes and a dot a gold stickles on the eyes and star for some sparkle. thanks for stopping by and happy creating!!  JEN T.

front of card


inside of card


close-up


To check out more awesome goodies and inspiration "like " Speedy Scrappers at www.facebook.com/speedyscrappers and visit the website at www.speedyscrappers.com  or get your supplies in the Speedy Scrappers store.


Tuesday, August 5, 2014

Thank you collage card using kaisercraft honey chai

Hi all, happy tuesday!!! Jen t. Here stopping by to share a card i made using the kaisercraft honey chai collection. And guess what it  is not a 6 x6 card.. It is a 5 x 6 card this time:)  I first had it as a 6 x 6 card but when I added the peach journal card and added the sticker borders I didn't like how my edge looked so I trimmed it off. I  then added the letter stickers from the collection to spell out thank you and fussy cut out some cute birds and butterflies from the glossy patterned paper and adhered them  (the butterfly and added a lil popdot for dimension) and then I took two of the black and white flower stickers and layered them with a popdot in between too and adhered that. then in my stash I found a pretty green ribbon to accent the card and a matching
 glitter brad that I put in the flower center. lastly, I distressed and inked the edges for a shabby chic sorta look . thanks for stopping by and happy creating!!


 What i used: 
Kaisercraft honey chai papers,glossy speciality paper, and border stickers 

                      From my stash:
Glitter brad
Green ribbon
Popdots
Brown distress ink


To check out more awesome goodies and inspiration "like " Speedy Scrappers at www.facebook.com/speedyscrappers and visit the website at www.speedyscrappers.com  or get your supplies in the Speedy Scrappers store.


Tuesday, July 29, 2014

Be you card using kaisercraft honey chai

Hi all,  happy tuesday!!! Today i am sharing a card that i made using kaisercraft honey chai papers and stickers. I first started out the other night coloring a stamped image i had from a swap with my watercolor pencils. I  then realized the next day that it went with the soft colors of the honey chai collection and got excited to put them together in a card. I then took out my old school fiskars oval cutter and cut out the middle of my image of the boats and set the two pieces aside while i made the base. For the base i cut a 6 x12 piece of the pink wood grain paper and folded it in half. Then i  placed the square part of the image on top and pop-dotted the oval in the middle while  leaving room on the bottom of the card to embellish a little. next, I added a border sticker underneath and cut out the inspirational word strip from the bottom of one of the patterned papers and made it look like a banner by trimming the edges and only gluing it down in a couple spots to give it a lil dimension. Lastly, I added lil flowers I punched out with pearl centers and added a word and letter stickers to accent the corner. oh! then I wanted to add texture so I tucked three flowers to the top left corner and wrapped some twine above the border strips. make sure you get your honey chia paper collection at speedy scrappers so that you can have as much fun with this collection as I am:)
 happy creating!   jen t.


To check out more awesome goodies and inspiration "like " Speedy Scrappers at www.facebook.com/speedyscrappers and visit the website at www.speedyscrappers.com  or get your supplies in the Speedy Scrappers store.


Tuesday, July 22, 2014

Blast off!!! Bookmark/card combo By jen t.


Hi all! Happy Tuesday! I am popping on today to share a card/bookmark that i made using the kaisercraft blast off collection. I first saw the awesome long cutout with the cute aliens on one of the patterned papers and thought how cool would that be to fit a business size envelope. So i trimmed it slightly to fit and then used that as a starting point. I 
Then added the red paper behind it to mat the cutout. Next, i added the word and number stickers for the sentiment and outlined it with my navy blue marker. Next, i fussy cut out two spaceships from another piece of patterned paper and set aside. I then wrapped the top of the card with twine taking note to leave a long piece to glue and sandwich the two spaceship pcs i just cut out so they would dangle from the card and i added a google eye to the middle alien to finish the front. On the backside, i cut another piece of red paper and added another long block cutout with space to but a note  and added two strips on the top and bottom with another patterened paper to add more interest. Lastly, with letters from my stash i added a reminder for the recipient to use it as a book mark. For the envelope i just added a border sticker just to fancy it up a bit.  

front

back


What i used: 
Kaisercraft blast off collection papers and stickers
Google eye
Red and white martha stewart twine
Spectrum noir navy blue marker
Gluedots
Scotch adhesive
Red Mini letters from my stash 
Standard business envelope 


To check out more awesome goodies and inspiration "like " Speedy Scrappers at www.facebook.com/speedyscrappers and visit the website at www.speedyscrappers.com  or get your supplies in the Speedy Scrappers store.


Tuesday, July 15, 2014

It's a celebration so Dream big!! By jen t.

Hi all, happy tuesday! Great to be back from a holiday break! Did you have a great begining of july? I can't believe we are half way thru already! So today i am sharing with you a 6 x6 card i made using the kaisercraft honey chai  line. I first cut and the pink woodlook paper into a 6x 12 piece and the folded it in half to make the base. Then i cut the burnt orange paper to approx. 5 1/2 inches and adhered it ontop. Next, i cut out the dream big card and  put it on top of the orange paper leaving a space under it where i then added a piece of the butterfly border sticker. At the top i also added stickers into the corner and layered them a bit. Lastly, i distressed the edges a bit and dusted gold ink and scribbled gold gel pen around the edges and finished it with drips of the gold mist. Oh! I almost forgot! I then rub some mist onto the butterflies with my finger and added the candy dots in the middle. 
Tip- unscrew the squirt top of mist spray and use the straw to put drops only in the spot you want---     
Thanks for stopping by and happy creating!  
~~jen t.~~


What i used: kaisercraft honey chai papers and stickers
Tattered angels gold glimmer mist
Gold gel pen
Metallic polkadot candy dots
We r memory keepers envelope board 
Gold ink 


To check out more awesome goodies and inspiration "like " Speedy Scrappers at www.facebook.com/speedyscrappers and visit the website at www.speedyscrappers.com  or get your supplies in the Speedy Scrappers store.


Tuesday, June 3, 2014

a lil birdie birthday card by jen t.

Hi all, Jen t. here. Happy Tuesday!  I am having alot of fun using the authentique classique collection for my recent projects! Did you get your collection yet? make sure you get it in store at speedy scrappers before they are gone! Today I am sharing with you a card I made using the collection and a bunch of my punches. I first, cut a 6 x12 piece of the lace-look paper then folded it in half to make a 6 x 6 card and added black ink lightly around the edges. Then I cut the black and turquoise paper and used my edge punch and adhered it to the base. Then, I layered two diecuts using popdots in between for dimension and spelled out happy birthday on top with the little alphas. Next, I used my XL flower punch and layered the flower with my butterfly punch for the middle.(tip-by layering and staggering the butterfly punched pieces it made a cool flower center-think out of the box with your tools). Lastly, I layered all the pieces together and secured it with a sparkle brad in the middle, added some punched leaves and a lil bird perched on top and wallah!  Have a great day and happy creating! Jen t.
  

What i used :
authentique classique papers,letter stickers,and diecuts
Prima resin bird
Black ctmh distressed ink
Pop dots
Scotch adhesive
Stampin up butterfly punch 
xl  ek sucess flower punch 
martha stewart border punch 
Ek sucess leaves punch 
Echo park sparkle brad 

To check out more awesome goodies and inspiration "like" Speedy Scrappers at www.facebook.com/speedyscrappers and visit the website at www.speedyscrappers.com  or get your supplies in the speedy scrappers store.


Tuesday, May 20, 2014

Happy birthday! Using authentique classique

Hi all jen t. here. I am stopping by to share a card i made using Authentique classique collection. First i cut and adhered the lace look paper to the base. Then i cut out a large journal card and adhered that on top. I then put the swirl of pearls and glued on the three flowers. Secondly, i cut out a piece of the blue paper from the collection and adhered that with pop dots then layered on the small journal card that I stamped happy birthday on. I added the mme brad to the shield symbol and inked all the
edges.lastly, I die cut the Eiffel tower pop dotted it and coated it with a thin layer of silver liquid pearls and also accented the pp with the liquid pearls.  have a awesome day and happy creating!
 jen t.  :)


What i used:
Authentique classique collection papers
Prima flowers
Prima say it with pearls 
Stampenduos happy birthday stamp
Hero arts Eiffel tower die
Silver liquid pearls 
ctmh black distressed ink
My minds eye brad
Ranger glossy card base 
Pop dots
Glue dots
Scotch adhesive


To check out more awesome goodies and inspiration "like " Speedy Scrappers at www.facebook.com/speedyscrappers and visit the website at www.

Tuesday, April 15, 2014

Dream big card


Hi all, happy tuesday!!! Jen t. Here.  i am stopping by to share with you another 4 x 6 card i made using the moxxie childs play collection. Let me just say that i had a ton of fun with this collection! So for this card, i used the red paper from the collection and embossed it with a star embossing folder i had. i lightly inked the edged with white ink. Then, i picked out a few of the shaped die-cuts that are double-sided btw and used the pattern side of each .i then put the sticker frame from the sticker sheet and then pop-dotted the joy diecut in the center but i didnt want to use the word joy so, i added the tree sticker over top. Then, on the oval diecut i added a dream big rub- on that i found in my stash and finished it off with my diy enamal dots ,twine and taped it to a kraft card base. Happy creating. And don't forget to always dream big! :) jen t. 


What i used: 

Moxxie childs play die-cuts,stickers,and red paper
Foam pop-dots
Diy enamel dots
Scotch atg gun 
Star embossing folder
Stampin -up white craft ink 


To check out more awesome goodies and inspiration "like " Speedy Scrappers at www.facebook.com/speedyscrappers and visit the website at www.speedyscrappers.com